
How I made my cover
This is a strange post for me, never have I done one that is so image rich but I want to share a small triumph in my writing. As a hobbyist writer I am pretty tight when it comes to spending money on marketing or editing, this also includes book covers. As an ICT and Computing teacher I utilise what technology I have as well as my knowledge of computers to knock up some pretty basic covers. At present it has been a few filters on a photo, logos designed in Adobe Flash and imported into Photoshop or getting other stock images and making them one solid colour. I spend the most time choosing my font. The covers do not look bad but they are not particularly professional. I decided, therefore, that for ‘A Close Shave with Destiny’ I would take a different approach. I would attempt to draw a scene. The only problem being, I can’t draw! However, in my excited state I bounded down to town and headed to The Works (it’s a UK shop that sells books, art supplies and games that are ex-stock and so now cheap!) and bought myself an A3 pad with pencils and a book on how to draw. This then sat on a shelf for about three months. Having completed NaNoWriMo and gone back to ‘A Close Shave with Destiny’ to edit it, I finally picked up a pencil. Below are step by step stages of how I did, I am not saying the writing is exciting so feel free to just look at the pretty pictures…
 Stage 1 – Basic shapes
I found out quickly that the art book I purchased did not actually give you many tips on drawing fantasy characters so I grabbed my phone and used the Internet instead. As my first proper drawing ever, I decided to take the three main characters and have them facing the reader, looking scared. Action scenes are a little too far for me at the moment. The story is set in a moustache so I wanted them standing above a depiction of one. I drew lines for the moustache and connected these up then used the characters head sizes to work out arm and body lengths. At this point things were going well!
 Stage 2 – Body outlines
The next stage was to get the general outlines for the bodies, I was quite impressed with how I did this, using lines to link up shapes. They were actually starting to look like humans! They did all have massive heads though so the rubber supplied with my art set came in very handy! Also I could not get the leg width correct but that did not bother me at present as I could change that later.
 Stage 3 – Faces
I cannot draw faces, as is clear from the image to the right! However, these are the best faces I have ever drawn. Again my wonderful drawing book was no help so I looked on the Internet and did a half copy, half reimagining job. I really like Wignut (the one in the middle) but the other two did not come out as well. I decided at this point that I was going for a rustic look so, despite a bit of editing, left them as they are. My wife thought the eyes on Wignut were the weakest but they are actually my favourite, along with his hair. I think it is because they look a little cartoony and that goes better with the ‘I can’t draw very well’ look.
 Stage 4 – Wignut’s clothes
Guess what?! Yep, that’s right, the book was absolutely no help with clothes! Again it was an Internet affair, looking at different images of drawn medieval clothes and cobbling something together. But I am happy with them, I particularly like the belt and the way I have made the clothes look a little like fabric by adding lines and making seams billow a little. There is not much detail but it gives the gist. My original plan had been to do basic outlines of the characters and use a fineliner pen to thicken the lines so it was more of a line drawing, but I liked Wignut’s look so decided to just go with the drawings at this point.
 Stage 5 – Svetta’s clothes
Svetta, if you have not work out by the fact she is the next one drawn in, is my female protagonist. I wanted her to look pretty but show she is a fighter and a quite good one at that. It was clear I could not draw pretty faces but maybe a nice outfit would make her character look better. Again it was on to the Internet to look at clothes. All the female medieval clothes were flowing dresses with lacey tie ups so I had to look at male warriors clothes and adapt them. Now I was not just looking at the characters outlines I could add some shading to my cover. That was in the art book but it had been so unhelpful up to this point I ignored it! If not as much as Wignut’s clothes, I do like the look of Svetta’s. She is clearly more than a pretty girl.
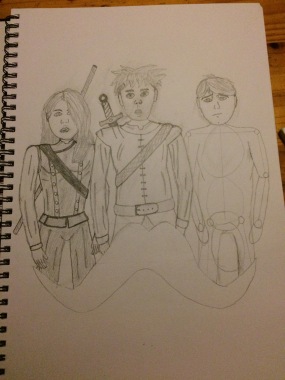
 Stage 6 – Barnabas’ clothes and moustache
I found Barnabas’ clothes the easiest to do, I had learnt from both Wignut and Svetta and as he is the hero’s aid I gave him basic clothes. I was worried how the pack on his back would look so tried not to do anything complicated and draw stitching or have it open with contents spewing forth. I think it works though. I also did the moustache as well, I was worried how to get the texture right but by not using a fineliner pen I could add strokes to it from the pencil I was using. I changed to a thicker pencil do to this. I don’t know why, it just felt right. I had picked a 3B for the rest, who knows why? Not me! Looking at the final picture I was quite happy, yeah the faces could be more detailed and the arms seem a bit long but I had managed to make the legs look better and there is the rustic charm I was after, or rather consolidated myself with. It is the best drawing I have ever done after all!
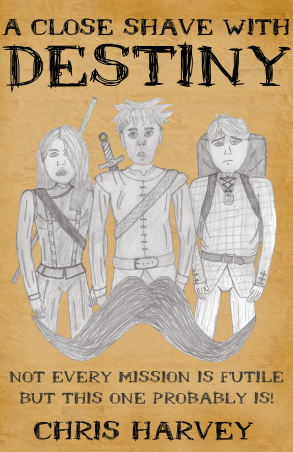 Stage 7 – PhotoShop
The final stage was the one I was most comfortable with, popping the image into PhotoShop. Firstly I scanned the image then working out what size my book would be and set up the relevant canvas on PhotoShop. Using the magic wand and rubber tools I removed the background as best I could. I did need to clone some areas where there were imperfections from the scanning process as well. After this I found a font I wanted. The most annoying thing about cover design is finding a font that is free for commercial use. I wanted something to go with the hand drawn theme and found Mr. B. It is a little more like pen strokes but I can live with that. A little placement and thinking about a tag line and the cover was taking shape. It is amazing how hard it is to create a tag line for a story about heroes setting out to gather snot from a nose as they live in a moustache. I decided to ignore that and go with the humour of the book instead. After this I tried solid colour backgrounds but none worked, I then went for a pattern which looked even worse. So onto the stock photo sites I went, looking for paper and found the one I have. Again it is free for commercial use. All in all I am pretty happy with it. It won’t win any awards but it looks professional enough, it not up to the standards of Penguin or HarperCollins publishing houses but it will do.
So there we have it, a quick run through of how I made my cover. I could go into more detail but it gets a little dull after a while. So now I need to finish editing the book, which could take a month or more, then create the spine and back cover. Hopefully it will be out some time in the next few months, I wouldn’t hold your breath though!


